Get answers from our community of experts in record time.
Join now- Technical Forums
- :
- Developers & APIs
- :
- Getting started with Meraki API using Python Part 2: Python Setup & Intro t...
Getting started with Meraki API using Python Part 2: Python Setup & Intro to Meraki Library
- Subscribe to RSS Feed
- Mark Topic as New
- Mark Topic as Read
- Float this Topic for Current User
- Bookmark
- Subscribe
- Mute
- Printer Friendly Page
- Mark as New
- Bookmark
- Subscribe
- Mute
- Subscribe to RSS Feed
- Permalink
- Report Inappropriate Content
Getting started with Meraki API using Python Part 2: Python Setup & Intro to Meraki Library
Getting started with Meraki API using Python: Part 2
Hi everyone! Welcome to Part 2 of a series of posts to get you started with Meraki APIs using Python!
Hopefully you are here because you have read Part 1 and are continuing your journey. If you haven’t, please do have a look at Part 1 so you get an understanding of the basic behaviour of Meraki API.
Ok so let’s get started!
First of all, of course, you need to have Python installed. This series will not cover installing Python, mainly because it depends on the Operating System you want to use, and also because it is relatively easy to install.
You can head to Download Python and download it.
Alternatively you can head to https://www.pythonanywhere.com/ and use their cloud bash shell.
If you will be using Python on your local machine, it is strongly recommended to use Python virtual environments when you are testing to prevent accidentally crashing your system. I strongly recommend getting into the habit of creating virtual environments for testing code.
“But how do you create a virtual environment?”, I hear you ask. Let’s go through it!
First, you will use the python venv module to create a virtual environment.
|
Python -m |
This option is used to call a python module. |
|
venv |
In this case we call upon the venv module. |
|
meraki_api_practice |
This is the name we are giving for the virtual environment. |
Now you will see a directory created with the name you provided. If you list the directory, you will see a bunch of files:
We don’t need to worry too much about the files for now, but we do need to activate the environment.
Since I am already in the directory, I will use the following command:
I can see that my prompt now shows that I am in my virtual environment, so whatever I do here will not affect my operating system!
Ok, now that my environment is ready, let us go through a few concepts before our first code.
To send requests to the Meraki Dashboard there are two ways:
- Use the python meraki library
- Use the python requests library
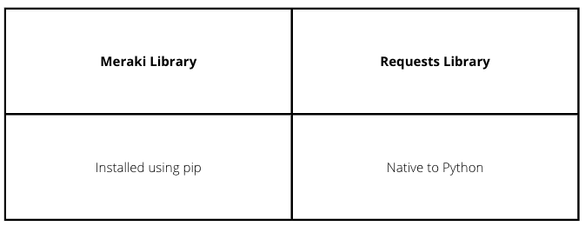
The Meraki Library is installed using pip, whereas the requests library is native to Python. This is one of the reasons why Python is very popular when it comes to programming. There are a lot of libraries out there that can be installed and used, which means that one doesn't have to recreate code; just check if there is a library, install, and use it!
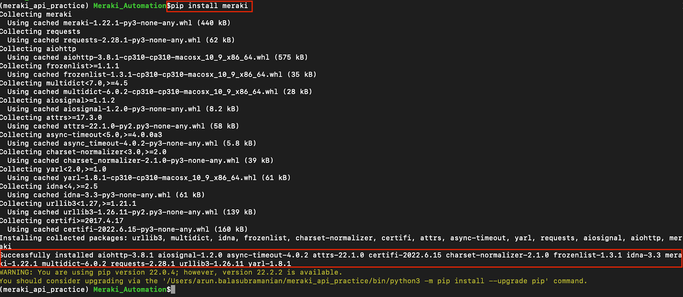
So, let’s install the Meraki library in our environment.
Another pip package I like to install is IPython. While it’s not really necessary, IPython gives a nice interface to run Python code, which leads to another Python concept.
One of the cool things about Python is that you don't have to compile it before you run code. You can pretty much run it directly from the Python interpreter.
Here I ran the Python command, and it took me to the interpreter which is identified by the 3 greater than signs in the prompt.
So, what code can I run here? This is where API docs come in handy.
Navigate to https://developer.cisco.com/meraki/api-v1/
Under API reference let’s navigate to API->Platform->configure->organizations->Get Organizations.
You should be here:
Select Template on the right:
Here you can see that you either copy the Meraki Python Library Code or the Python-Requests Library code.
Let us start with the Meraki Python Library Code.
Now paste it into the terminal with the Python interpreter running.
In the first box, you can see that immediately after dashboard = meraki.DashboardAPI(API_KEY), an API session is being established. We can see the base_url and the version of the Meraki Library being used.
In the second box, you can see two GET requests and then a 200 OK. If you have read Part 1, you would be familiar with why there are 2 GET requests and also the 200 response.
You might notice that now the prompt is waiting for you at print(response).
If you hit Enter, you will see a huge text output (we will cover this later).
If you have managed to get to this point, congratulations! 🎉You have just made your first API request to Meraki Dashboard!
So now you may be wondering, what is it that I have accomplished here? It’s simple, you have just fetched a list of organizations from a Meraki Dashboard.
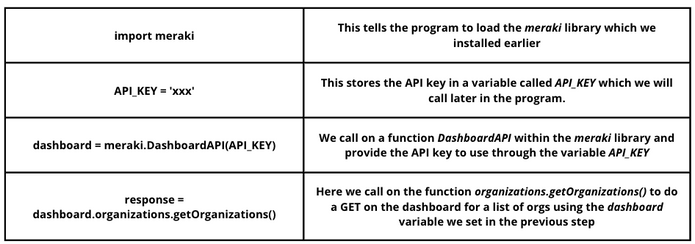
Let’s break it down!
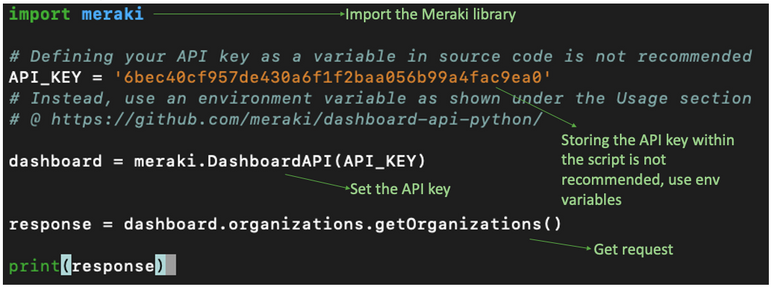
This is the code.
As you may have noticed, we do not recommend storing the API key in this manner. We are simply doing this here to make it easy to understand what is going on.
Why is this not recommended? Because if you share the code (which most of the time one does), then you have just shared your API key as well.
What, then, is the recommended way, you ask? Well, there are many ways to secure the key. I will share the method I have used: OS env variables.
If I do directory listing and also include hidden files on my working directory:
I can see there is a .env file. What is this file? Let's read it using cat.
Ok, so I have stored the API key using a variable called API_KEY in a file called .env (the dot makes it a hidden file). By storing the API Key here, I don't have to put it in my code. Now when I do share it, I don’t have to worry about my API key being exposed.
Cool, so now how do I call on my API key within my script then?
Let’s see.
Adding these few lines will allow my Python code to get the API key from the .env file.
Let’s break this down!
If you see the previous get org’s code, we used a variable API_KEY to set the key. It is the same, but now we read it from our .env file.
Now try the code again yourself, but this time use the API key from your environment variable.
Alright! We will sign off here now, but look out for Part 3 in this series to continue the journey further!
Please leave your comments/questions/feedback below to help us continue this further. Also don’t forget to subscribe to Getting Started to get notified on the next post!
- Labels:
-
Getting Started
-
Python
- Mark as New
- Bookmark
- Subscribe
- Mute
- Subscribe to RSS Feed
- Permalink
- Report Inappropriate Content
@Arun_TE : Thanks Arun for the update !
- Mark as New
- Bookmark
- Subscribe
- Mute
- Subscribe to RSS Feed
- Permalink
- Report Inappropriate Content
Thanks @Inderdeep for follwing!
- Mark as New
- Bookmark
- Subscribe
- Mute
- Subscribe to RSS Feed
- Permalink
- Report Inappropriate Content
Big effort. Well done!
- Mark as New
- Bookmark
- Subscribe
- Mute
- Subscribe to RSS Feed
- Permalink
- Report Inappropriate Content
Thanks mate!
-
Bluetooth
3 -
Captive Portal API
11 -
Code Sample
63 -
Dashboard API
376 -
Getting Started
10 -
Other
6 -
Python
13 -
Scanning API
28 -
Updates from Meraki
50 -
Webhooks
19 -
Webinars
6


