Get answers from our community of experts in record time.
Join now- Technical Forums
- :
- Developers & APIs
- :
- Re: Getting started with Meraki API using Python: Part I
Getting started with Meraki API using Python: Part 1
- Subscribe to RSS Feed
- Mark Topic as New
- Mark Topic as Read
- Float this Topic for Current User
- Bookmark
- Subscribe
- Mute
- Printer Friendly Page
- Mark as New
- Bookmark
- Subscribe
- Mute
- Subscribe to RSS Feed
- Permalink
- Report Inappropriate Content
Getting started with Meraki API using Python: Part 1
Getting started with Meraki API using Python: Part 1
Hi Everyone! This post is in response to a large demand from the Meraki community to have something for people to get started on the Meraki API using Python. Here we have Part 1 of a series of Community posts focused on helping you navigate the basics of leveraging the Meraki API using Python. We'll share a new post every month. You can subscribe to the label "Getting Started" to receive an email notification for the next part in this series.
Now before we get started with Python, let's cover a few basics, namely what is an API.
Application Programming Interface
An API is basically a way for two pieces of software to talk to each other.
REST API
There are many different types of APIs and one of them is the REST API. REST stands for Representational State Transfer. What it means is that it involves transferring the representation of the state of information between applications. It is not a protocol like TCP or UDP, it is an architecture, hence as with any architecture it is defined by a set of constraints. A few of those relevant for us here are listed below:
- It is Server-Client architecture
- It is Stateless
- Cacheable
- Uniform Interface
- Layered
We won't go through all the constraints in detail as we want to keep this simple for now, maybe for another post!
REST uses HTTP as the transaction method and JSON format for data. This makes life easy as we don't have to learn a whole new protocol for APIs. It uses the same HTTP that is used on the Internet.
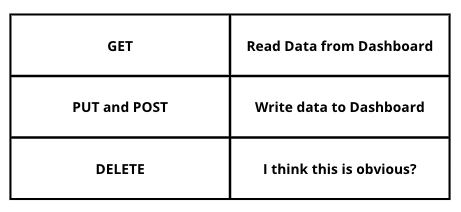
Therefore interacting with an API server such as the Meraki Dashboard would involve just using HTTP verbs such as :
- GET
- PUT
- POST
- DELETE
Of course, there are more actions available, but we are just focusing on the most common ones for now.
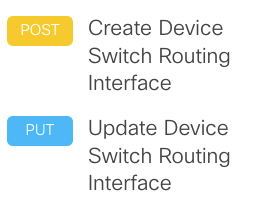
As you noticed PUT and POST are both used for writing to the Dashboard, to put it simply you would use POST to create data and PUT to update or edit existing data. For example we use a POST to create a Routed Interface on the switch and a PUT to update an existing one.
Java Script Object Notation or JSON, is the format in which data is sent between your machine and the Dashboard.
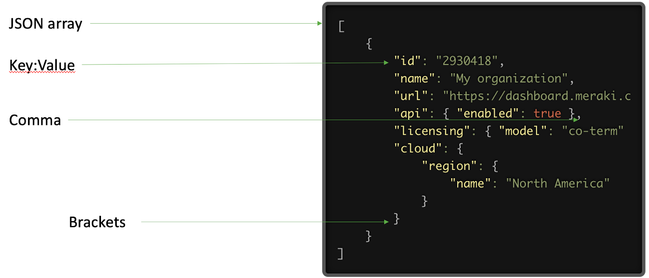
What does JSON data look like? Let’s take a look at an example. Here we can see a dashboard organization retrieved from a dashboard using a GET.
The attributes of an organization are described through the use of key-value pairs. In this example we can see the organization’s id, name, url etc.
Using cURL to understand the Meraki Dashboard API
Ok! Now that we know what REST APIs are all about, let's get hands on and try a few requests to the Dashboard!
For this one tool that can be used in cURL, another Postman but let's use cURL for now.
curl -L --request GET \
--url https://api.meraki.com/api/v1/organizations \
--header 'Content-Type: application/json' \
--header 'Accept: application/json' \
--header 'X-Cisco-Meraki-API-Key: *****'
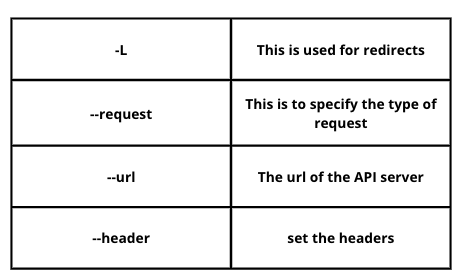
As you can see, we issued a GET request using cURL using the above command. We will learn about processing the output later but for now let’s break the cURL request down!
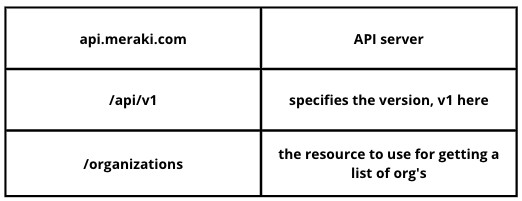
For the headers we set to accept and send JSON data and we also send an API key (we will get to this in a bit) for authentication. The url points to api.meraki.com which is where you would send your requests to. Note the v1 in the URL, Meraki APIs are currently on v1 and v0 is deprecated.
Now let’s use the -v, which is for verbose with the same cURL command and check the output.
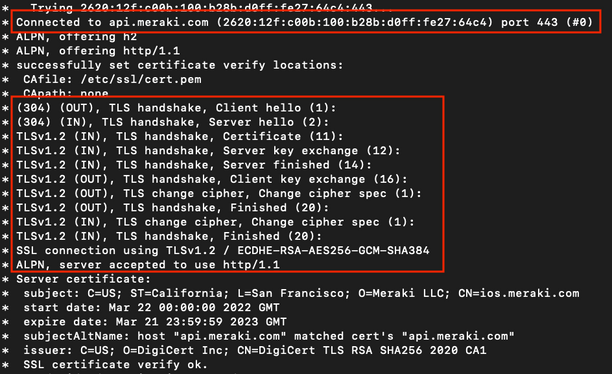
First we see the connection to api.meraki.com (yes our Dashboard supports IPv6!):
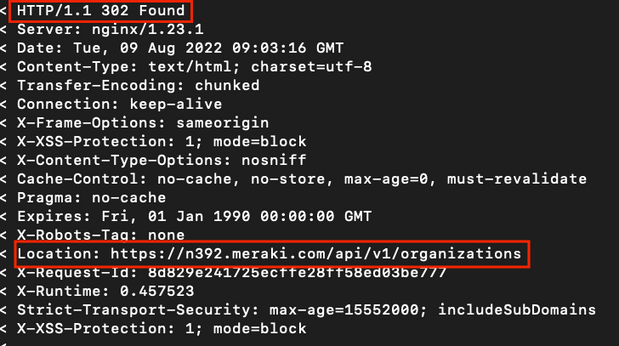
Next, we see a 302!!
So what is a 302? It is a redirect! Why do we get a redirect? That is because we are being redirected to our Dashboard instance based on the API key we used. api.meraki.com is an API server url we use so we don’t have to remember our individual dashboard instance url. If you notice, on the 5th line from the bottom you can see the redirect location to the specific dashboard url.
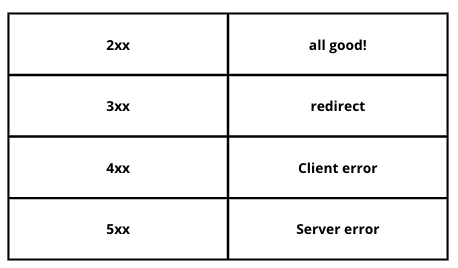
So here are some common responses you will see.
- If the response is in the 2xx range such as 201 or 200 then the request was successful. We will get to the specifics on the differences between 201 and 200 later on, but as always let’s keep it simple for now!
- If the response is in the 3xx range as we saw in our example it is a redirect.
- If the response is in the 4xx range then the error is on the client side, we would need to check our request, for example an incorrect API key.
- If the response is in the 5xx range then the issue is on the server side, in our case the dashboard side.
Alright, I think we now have some understanding of the API interaction happening with the Meraki Dashboard. We will sign off for now but stay tuned for Part 2 where we shall continue our API journey further!
In the meantime, please don't forget to subscribe to "Getting Started" to receive a notification when Part 2 goes live and also please leave your thoughts/feedback/comments below so that we can improve the posts to focus on the needs of the community.
- Labels:
-
Getting Started
-
Python
- Mark as New
- Bookmark
- Subscribe
- Mute
- Subscribe to RSS Feed
- Permalink
- Report Inappropriate Content
@Arun_TE : Awesome thanks
- Mark as New
- Bookmark
- Subscribe
- Mute
- Subscribe to RSS Feed
- Permalink
- Report Inappropriate Content
- Mark as New
- Bookmark
- Subscribe
- Mute
- Subscribe to RSS Feed
- Permalink
- Report Inappropriate Content
- Mark as New
- Bookmark
- Subscribe
- Mute
- Subscribe to RSS Feed
- Permalink
- Report Inappropriate Content
Yassss!! Gimme more of the good stuff. I just started playing around with the API to see what kinds of extra information I could get. Thank you!!
- Mark as New
- Bookmark
- Subscribe
- Mute
- Subscribe to RSS Feed
- Permalink
- Report Inappropriate Content
Thanks @PacerX , hopefully you have noticed that Parts 2 and 3 are out already and also subscribed to "Getting Started"
- Mark as New
- Bookmark
- Subscribe
- Mute
- Subscribe to RSS Feed
- Permalink
- Report Inappropriate Content
I have seen that the other parts are out and thank you for sharing! Unfortunately programming and python are not my strong areas so I am working through things slowly but I will get there. 😄
- Mark as New
- Bookmark
- Subscribe
- Mute
- Subscribe to RSS Feed
- Permalink
- Report Inappropriate Content
Just Gold !!!
- Mark as New
- Bookmark
- Subscribe
- Mute
- Subscribe to RSS Feed
- Permalink
- Report Inappropriate Content
- Mark as New
- Bookmark
- Subscribe
- Mute
- Subscribe to RSS Feed
- Permalink
- Report Inappropriate Content
This is great information, thanks for creating this!
-
Bluetooth
3 -
Captive Portal API
11 -
Code Sample
63 -
Dashboard API
376 -
Getting Started
10 -
Other
6 -
Python
13 -
Scanning API
28 -
Updates from Meraki
50 -
Webhooks
19 -
Webinars
6


