Get answers from our community of experts in record time.
Join now- Technical Forums
- :
- Developers & APIs
- :
- Getting Started with Meraki API using Python Part 4: Intro to Requests Libr...
Getting Started with Meraki API using Python Part 4: Intro to Requests Library
- Subscribe to RSS Feed
- Mark Topic as New
- Mark Topic as Read
- Float this Topic for Current User
- Bookmark
- Subscribe
- Mute
- Printer Friendly Page
- Mark as New
- Bookmark
- Subscribe
- Mute
- Subscribe to RSS Feed
- Permalink
- Report Inappropriate Content
Getting Started with Meraki API using Python Part 4: Intro to Requests Library
Hi Everyone! Welcome to Part 4 of a series of posts to get you started with Meraki APIs using Python!
In Part 3, we saw how to read and process the response we got from the GET request made using the Meraki library in Python in order to retrieve a list of organizations. Along the process, we discussed different data types (Lists and Dictionary), loops (For and While), and if-else statements. In this post and the next, we will look at how to use an in-built python library called “Requests” to do the exact same thing – but differently!
In this post, we will only focus on the basics of the Python requests library but more to come in the next post. Before we get started, if you haven’t already gone through previous parts yet, please do so before proceeding by going to this link.
What exactly is the Python Requests library and why should you care?
Requests is an elegant and simple HTTP library for Python, built for human beings. It allows you to send HTTP/1.1 requests extremely easily and interact with several applications like Meraki Dashboard using APIs.
Developers around the world have been using this library even before we came out with Dashboard APIs or the Meraki library, making it one of the most popular/downloaded python libraries. It is quite obvious that you can do pretty much everything using just the Meraki library but the hard-core developers are already familiar with the Requests library since the get-go when dealing with APIs or making an application that makes use of APIs. So depending on who you are and where you are getting started from, feel free to use either libraries or maybe both whichever you are most comfortable with.
How do you install the Requests library?
The Requests library is not part of the standard libraries that come with default installation of Python. This means you will have to install it manually by using the pip install requests command as follows:
Now that you have the Requests library installed, let's see how to use it in Python. But before I get into the basics of Requests library, I want to circle back to a concept of security that we discussed at the end of Part 2. We strongly recommend NOT to use API key as-is in the code because when you share the code, you are basically exposing your API key. Yes, it is easier from a beginner or testing perspective. At this point though, I am sure you are comfortable with the basics of Python, so I would like everyone to begin using environmental variables moving forward to store API keys.
Don't worry! You are not on your own. Here is a quick recap on how to use environmental variables in both Linux/MacOS and Windows systems.
Linux/MacOS:
Here are the steps for initial one-time setup:
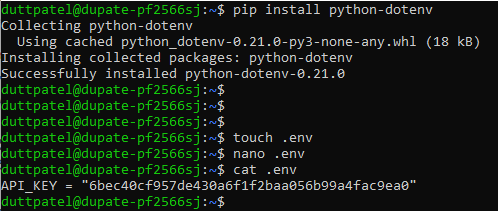
- Install python-dotenv library using pip install python-dotenv
- Create a new file called .env using touch .env
- The . makes it a hidden file A.K.A Super Secret file
- Copy-Paste the API key in .env file in variable = value format using nano .env
- The content is API_KEY = “6bec40cf957de430a6f1f2baa056b99a4fac9ea0”
- Use cat .env to confirm the content of .env file
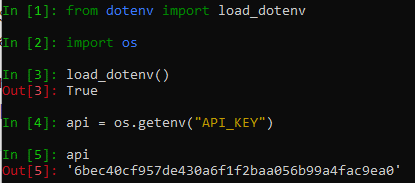
Now, to use the API key inside of your code, do the following:
- Import the “dotenv” library you installed earlier
- from dotenv import load_dotenv
- Import “os” library to interact with the environment variables
- import os
- Load the environment variables stored in the .env file created earlier
- load_dotenv()
- Get the value of API_KEY environment variable and store it in a python variable (say api) that can be used throughout the program without exposing the actual API key
- api = os.getenv("API_KEY")
Windows:
Here are the steps for initial one-time setup:
- Press the Windows key on your keyboard to open Search menu
- Type “env” and click on “Edit the system environment variables”
- Click “Environment Variables” button on bottom-right corner of the dialog box
- Click “New” button on either the User variables (only you can use it when logged in as you) or System variables (anybody logged into the machine can use it)
- Set the following values within the dialog box that opens and click OK all the way:
- Variable name: API_KEY
- Variable value: 6bec40cf957de430a6f1f2baa056b99a4fac9ea0
Now, to use the API key inside of your code, do the following:
- Import “os” library to interact with the environment variables
- import os
- Get the value of API_KEY environment variable and store it in a python variable that can be used throughout the program without exposing the actual API key
- api = os.getenv(“API_KEY”)
Awesome! Now that we have security taken care of, let's finally jump into the basics of the Python Requests library.
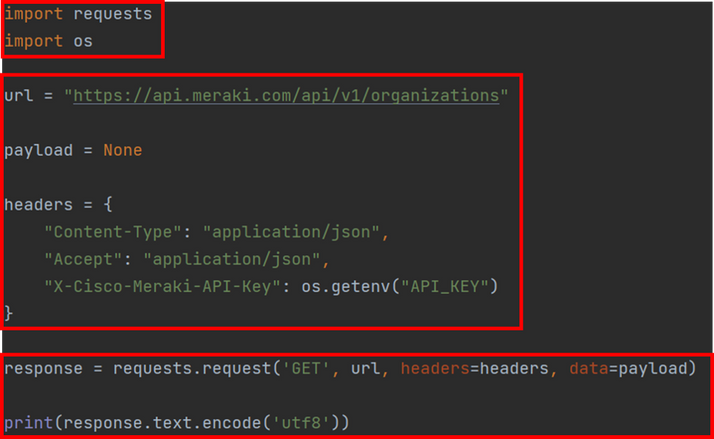
Take a look at the following piece of code which basically sends a GET request to Meraki Dashboard to get a list of organizations but all using the Requests library this time:

As you may have already noticed, there is a whole lot of code as opposed to using the Meraki library here. This is because with the Meraki library most of the things are already set by default so you don't explicitly have to. Let's unpack the highlighted code blocks to make more sense.
The first block simply imports the libraries that will be used for this program. The requests library is pretty obvious but then I have also added the os library. This code is actually on a Windows machine so I only have to include the os module. For Linux/MacOS, you will also have to import the dotenv library and load it early on like we discussed in the previous section.
The second block is the core of this program and it sets the parameters that an HTTP GET request will use to make an API call.
- The url variable sets the base URL (https://api.meraki.com/api/v1/) plus the organizations API endpoint (/organizations).
- The payload variable stores any parameters you want to pass with the API request in the form of a key-value pair. In this case, it is set to None because it's a simple GET organizations request which only needs an API key to work. If you were to get a specific organization then you will have to pass in parameters like an org ID.
- The headers variable will include information on the type of data that will be sent (Content-Type) and what is expected to be received (Accept). In our case we are sending and expecting data in JSON format. An API key is also set here for authentication.
The third block is used to actually prepare and send the API request and then store the response in the response variable. For this we use the request method within the requests library and then pass in several parameters like the HTTP method (GET, PUT, POST, DELETE), the headers, and the data (i.e. payload).
Now one thing you will notice is that printing the response is not quite straight forward here from what we have seen so far. This is because we are using HTTP to interact with the dashboard and so the response will come in the form of HTML. So we first extract the text part of the response (.text) and then encode it in utf8 (.encode(‘utf’)) so it's human readable.
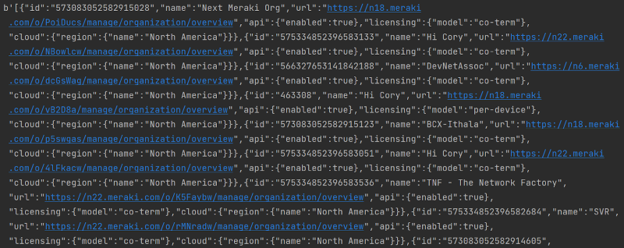
Below is the output we should see:
It's the same output (trimmed for posterity) that we received in Part 3 after running the GET organizations call using the Meraki library, but with a twist!
Can you find the twist or notice something odd that stands out when you compare the output here and the one you received in Part 3? If so then please leave a comment below but if not, we will discuss this in the next post with some advanced deep-dive into Requests library and more.
We will sign off here now, but look out for Part 5 in this series to continue the journey further!
Please leave your comments/questions/feedback below to help us continue this further. Also don’t forget to subscribe to Getting Started to get notified on the next post!
- Labels:
-
Dashboard API
-
Getting Started
-
Python
- Mark as New
- Bookmark
- Subscribe
- Mute
- Subscribe to RSS Feed
- Permalink
- Report Inappropriate Content
-
Bluetooth
3 -
Captive Portal API
11 -
Code Sample
63 -
Dashboard API
376 -
Getting Started
10 -
Other
6 -
Python
13 -
Scanning API
28 -
Updates from Meraki
50 -
Webhooks
19 -
Webinars
6


